Call me basic but, my nails give me POWER. I got my first pair of acrylic nails in the quinceañera season in Caracas circa 2007. I remember the day like it was yesterday. My mom made appointments to get our nails done, except this time I wasn’t going for the regular mani. This was my moment. I was getting long, sexy nails at 15 and they were going to change my life forever.
Ever since then my love for getting my nails done just increased. Eventually, I ditched the acrylic and entered a new era. Polygel. 💅 Considered the new healthier alternative for long-lasting and flexible nails, polygel has become very popular as it does not contain the harsh chemicals often found in acrylic products.
A few months before moving to Canada, I decided to learn how to do it myself at home because the prices for appointments in Toronto were INSANE. I wanted convenience and affordability so I dived deep into Amazon and chose the best-rated products to try.
After months of practicing and a lot of trial and error -and I mean, a lot- here are my thoughts and tips to get salon-level polygel nails at home.
Find a Kit with Neutral Polygel Tones
Neutral polygel tones, such as nude, beige, or soft pink, are incredibly versatile and can complement any outfit or occasion. They offer a timeless and classic look that never goes out of style. On the other hand, they are VERY forgiving.
Polygel is a unique nail enhancement material that requires a learning curve to master its application. Neutral tones are more forgiving when it comes to application errors. They are less likely to show imperfections, uneven application, or air bubbles, making it easier for beginners to achieve a polished look.
I got a Modelones Poly Nail Gel Kit; it was the perfect combination of colours to try. Also, it is a great price for all the things it includes.
*Note: this kit does not include a UV lamp*
Nail Prep Is Everything
Proper nail prep is KEY if you want your nails to last longer and look fresh. Begin by prepping your natural nails. Push back your cuticles, trim if necessary, and gently buff the surface of your nails.
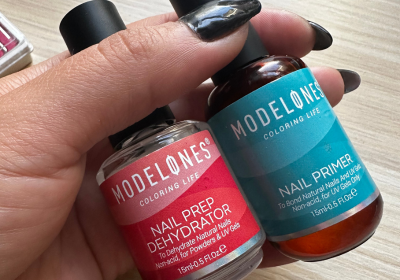
Dehydrating the natural nail with a dehydrator and applying a primer helps remove any oils, moisture, or contaminants from the nail plate. This creates a clean and dry surface for the polygel to adhere to effectively. The polygel is less likely to lift or peel off prematurely by improving adhesion.
I knew this was a must because my nail technician back in Mexico told me it was her secret for a successful long-lasting set of nails. The Modelones set I got didn’t include primer and dehydrator but I found a bundle under $20 with both of the same brand. Check the Natural Nail Prep Dehydrate & Bond Primer Set from Modelones.
Application Technique and Options
Select a polygel shade that you like and apply a thin layer of base coat onto your nails (a base coat is essential for polygel to stick properly, do not skip this step). Dip your brush into the slip solution to prevent the polygel from sticking and have better control of it, then take a small amount of polygel and place it onto the dual form or nail tip. Press the polygel into the desired shape and size, ensuring it covers the entire nail area. Once satisfied, cure it under the UV/LED lamp according to the kit’s instructions.
After curing, carefully remove the dual form or nail tip. Use a nail file to shape and refine the polygel to your desired length and style. Take your time with this step to achieve the perfect shape.
*Note: By skipping the dual form or nail tip, you can create a protective layer or enhance the natural appearance of your nails with polygel.*
Enhance Your Polygel Manicure with Gel Color
If you’re looking to infuse some extra colour into your polygel nails, consider applying a gel colour over them. To ensure a lasting and vibrant result, start by applying a thin layer of the base coat once more onto your polygel nails. This will aid in better adhesion of the colour and significantly boost its longevity. Cure it for 30 seconds (depending on the strength of your UV lamp) and using a gel nail polish brush or applicator, gently layer the desired gel colour over the prepared base coat on your polygel nails. Ensure smooth, even application while avoiding the cuticles for a neat and professional finish.
Once you’ve applied the gel colour, cure your nails under a UV or LED lamp as per the gel polish instructions. Apply additional thin coats of gel colour for a more intense hue or to achieve the desired opacity, curing each layer under the lamp. To complete the manicure, seal the coloured gel with a thin layer of clear gel top coat. This step adds brilliance, secures the colour, and fortifies the durability of your manicure. Cure the top coat under the UV/LED lamp according to the product instructions.
Nailing the Maintenance Game
One of the secrets to flaunting flawless polygel nails is keeping them nourished and happy. Show some love by regularly applying cuticle oil to hydrate those nails and prevent any pesky lifting situations. Trust me, hydrated nails are happy nails!
When it’s time for a change, safely remove the polygel by soaking your nails in acetone or using gel nail removal wraps.
Pro Tip: Revamping Without the Drama
Now, here’s a gem of a tip: If you’re not ready to say goodbye to your stunning length and style, and your polygel is still holding tight, you can reapply a thin layer of polygel! Yes, you heard that right. Simply add a touch-up layer and cure it under the lamp without completely removing the existing polygel. Voilà! Your nails will be revived without the fuss of a full makeover.
Last Recommendations and Tips
- Invest in a high-quality polygel kit to ensure better results and longevity.
- Practice makes perfect! Don’t get discouraged if your first attempt isn’t flawless. Mastery comes with practice.
- Watch tutorials and follow step-by-step guides to gain a better understanding of the process.
- Don’t rush through the curing process. Follow the recommended curing times to ensure the polygel sets properly.
- Experiment with different designs, colours, and nail art to showcase your creativity and style.
Whether you’re into vibrant colours, sleek designs, or sophisticated styles, polygel nails offer an endless canvas to express your unique flair. And hey, experimenting is part of the fun, right?
Remember, ladies, practice makes perfect. Don’t shy away from trying new techniques or designs. Embrace the learning curve and enjoy the journey to becoming your very own nail artist extraordinaire!
So, gather your tools, cue your favourite playlist, and let’s nail this polygel game together! Cheers to fabulous nails and endless creativity! 💅✨


